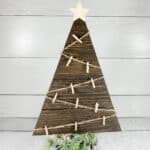
DIY Rustic Christmas Card Holder
easy DIY rustic christmas tree card holder to display christmas cards or photos
Servings: 1 christmas tree
Cost: $10
Equipment
- bristle brush
- floral wire cutters
- floral wire
- scissors
- hot glue gun and 1 glue stick
- cloth
Ingredients
- wood christmas tree
- wood stain walnut
- twine
- wood star
- christmas pick
Instructions
- Using your brush, apply the wood stain to your Christmas tree going with the grain. Make sure the tree is completely covered.
- Let your stain sit for up to 5 minutes depending on how dark you want the color to be. The longer you leave it on the darker it will be.
- Wipe off the extra stain with a clean lint free cloth.
- Let it dry. It takes about 2 hours.
- Glue the twine to the back and wind it around to the front at an angle. To get the zigzag effect, you are going to glue the twine to the back each time you wind it around and go in the opposite direction.
- Add the mini clohthespins. Once you have them where you want them, glue the backs of the clothespins to the christmas tree so they will support the weight of the cards better without flipping over.
- Glue the wood star to the top of the tree.
- Cut the ends of the christmas pick off and attach it to the base of the Christmas tree with floral wire.
