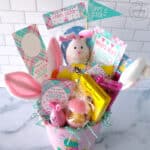
You've Been Egged Tutorial
a tutorial for how to download, print and assemble your You've Been Egged printables and easter basket
Servings: 1 easter basket
Cost: $10
Equipment
- 1 pair of scissors or paper trimmer
- hot glue gun
- hole punch
Ingredients
- 7 pieces white cardstock I do not recommend printer paper as it will negatively affect the quality and durability of these printables.
- FREE You’ve been Egged printables Get them here
- small wooden dowel for the mini flag
- twine, ribbon, or string for the gift tag
- basket, bucket, bag, or tote
- treats, candy, party favors, and little gifts
- floral foam optional – depending on the size of your bucket or basket
- 2 packs easter grass
- easter goodies to fill your basket with Dollar Tree is a great place to find gift ideas!
Instructions
How to Download The Printables
- Download the PDF Files by clicking this link.
- Select the files you want to save.
- Click the download button on the upper right side of the screen.
- Save the files to the folder you want.
How to Print
- Load the cardstock or printer paper into your printer’s paper tray.
- Set the paper format to cardstock on your printer's settings. The location of this setting will vary depending on your printer.
- Open the printables with Adobe Acrobat or another PDF reader software.
- Go to File –> Print. Ensure the print quality is set to the “Best” setting.
- Select “Actual Size” from the Paper Sizing Settings so that it won’t print big copies that take up the whole page.
- Press the Print button
How to Assembly the Gift Basket with the Printables
- Use a paper trimmer or scissors to trim off the excess paper from the printables.
- Glue the mini flag on top of a wooden dowel.
- Hole punch your gift tag and attach it to the gift using some baker’s twine, yarn, or ribbon.
- Glue or tape your party favor labels to the tops of your party favors. If they aren’t the proper size for your bags, you can always resize them in your photo viewer program or trim the sides down as necessary.
- Add floral foam or filler to the bottom of your bucket, if necessary.
- Add one bag of grass on top of your foam (or as much as needed).
- To make your bucket start by placing the taller and bigger items in the back of your basket. This includes your door hanger, mini flag, easter picks (if using), and instructions printables.
- Work your way toward the front of the basket by layering medium-sized items in front of your bigger items, adding more easter grass between the items.
- If you need to create some added height to make certain items seen more prominently, you can add a small amount of shredded paper to that spot to raise it above the other items.
- Finally, add your smallest items to the front of the bucket, such as plastic eggs and your small sign.
