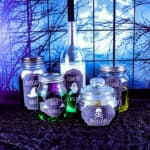
Free Printable Potion Bottle Labels
Unleash your inner witch or wizard this Halloween with our free printable potion bottle labels, designed to transform ordinary jars into a magical array of bewitching brews and eerie elixirs
Servings: 4 pages
Cost: $15
Equipment
- Inkjet printer
- Cricut machine (optional) I used the print-then-cut option on my Cricut machine to cut the labels. It's not only easier but will make them look more professional. However, you can cut them out by hand if you don't have an electronic cutting machine.
- scissors
Ingredients
- Matte Sticker paper Matte paper must be used for the Print Then Cut Cricut method because reflective materials - such as a glossy finish - will interfere with the sensor.
- Mason jars, glass bottles, wine bottles, etc.
- Food coloring, paint, or dye to add color to your Halloween potions.
- Potion label files (PDF or PNG)
- Spooky things to place in your bottles, such as eyeballs, spiders, mini skulls, etc. see post for suggestions
Instructions
Downloading the Files and Preparing to Print
- Click the PNG button above. It will open in Google Drive. Click the download button on the top right. It will save to your downloads folder. Unzip it.
- Load your sticker paper into your printer's paper tray and select the correct paper source from your printer's menu. Most printers require the paper to be loaded with the side you want printed on facing down.
Using Cricut Design Space to Print and Cut the Labels
- Open Cricut Design Space.
- Click the New Project button.
- Tap the Upload button.
- Click Upload Image.
- Select the PNG file that you want to print.
- Click Open.
- Select Complex image type and click continue.
- The background is already transparent, so don't worry about the background remover option. Just click the continue button again.
- Select upload type option #2 (Print then Cut Image). Click upload.
- Add the image to your canvas by selecting it under recent uploads and clicking "add to canvas."
- If the image is too large for your project, you can resize it to fit the size of your bottles.
- Click the "Make it" button.
- Under the Print Setup, select your printer, uncheck the "add bleed" option, and click print.
- Please note that if you have never used the print and cut feature, you may be asked to calibrate your printer to ensure accurate cuts. If so, follow these instructions.
- Add your printed labels to your mat and click continue.
- Set the material type to Printable Sticker Paper.
- Feed it into your machine by pressing the load button on your machine.
- Press the go button on your machine to begin cutting your labels.
- Remove the sticker paper from the mat.
- Peel off the labels from the paper.
- Apply the labels to your glass jars and bottles.
- Fill your glassware with spooky items and/or food coloring and water.
Notes
I used the print-then-cut option on my Cricut machine to cut the labels. It's not only easier but will make them look more professional. However, you can print them normally and cut them out by hand if you don't have an electronic cutting machine.
If you choose to do that, then I included a high-quality PDF file to download. Open the file in Adobe Acrobat and follow these instructions:
-
Go to File —> Print.
-
Select “Fit” from the paper size settings.
-
Click the printer settings at the bottom window.
-
A printer setup dialogue box will open. Under the Media and Quality settings, ensure the quality is set to the "Best" setting before printing. Make sure you select "Best" quality.
- Then press print.