Subscribe to the latest

    ↑
    • Home
    • DIY & Crafts
      • Home Decor
      • Organization
      • Crafts
      • Gardening
      • Gifts
      • Cricut Projects
      • SVG Files
    • Printables
      • Coloring Pages
      • Free Printables
      • Printables Library
    • Holidays
      • Summer Ideas
      • Fall
      • Halloween
      • Thanksgiving
      • Christmas
    • Recipes
      • Cheap & Easy Recipes
      • Slow Cooker
      • Instant Pot
      • Healthy
      • Desserts
    • Frugal Living
    • About

    Prudent Penny Pincher

    Save Money on DIY, Recipes, Crafts, Home Decor and More

    • Home
    • DIY & Crafts
      • Home Decor
      • Organization
      • Crafts
      • Gardening
      • Gifts
      • Cricut Projects
      • SVG Files
    • Printables
      • Coloring Pages
      • Free Printables
      • Printables Library
    • Holidays
      • Summer Ideas
      • Fall
      • Halloween
      • Thanksgiving
      • Christmas
    • Recipes
      • Cheap & Easy Recipes
      • Slow Cooker
      • Instant Pot
      • Healthy
      • Desserts
    • Frugal Living
    • About

    Home » Holidays » Christmas » DIY Rustic Christmas Card Holder

    DIY Rustic Christmas Card Holder

    Published: Nov 29, 2021 by Stephy Leave a Comment This post may contain affiliate links. · As an Amazon Associate I earn from qualifying purchases.

    Jump to Tutorial Print Tutorial

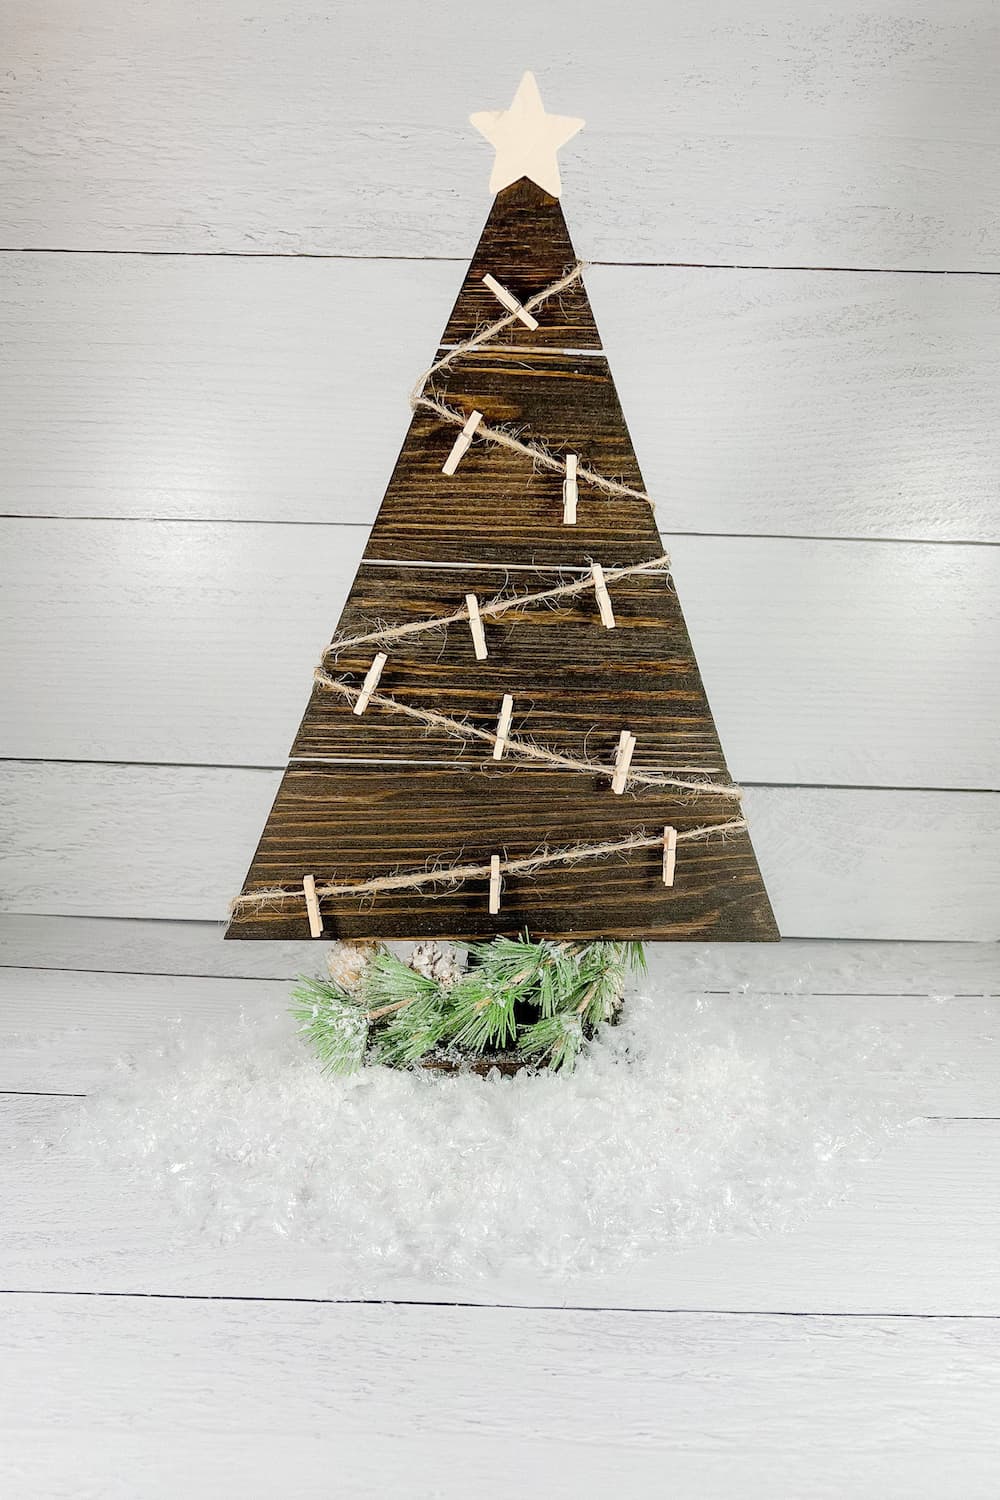
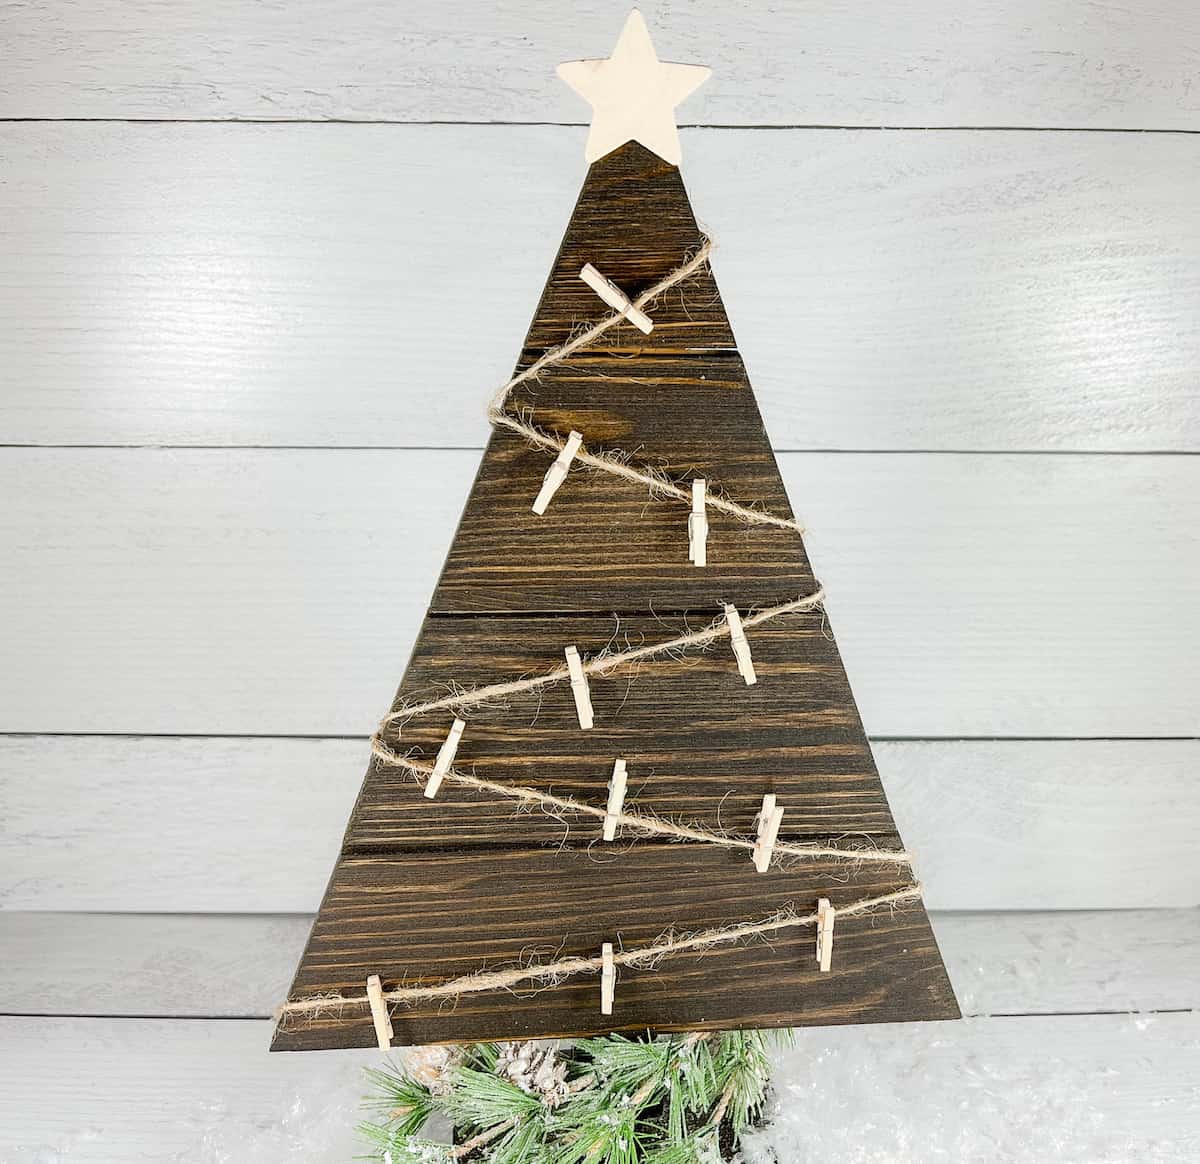
    Display your favorite christmas cards and Christmas photos with this easy DIY rustic wood christmas tree card holder this holiday season.

    It’s free-standing so it fits perfect on a tabletop so it makes a great DIY christmas decoration to showcase your holiday cards on one of your tables or the fireplace mantel. Your guests will love this sentimental christmas card display idea.

    It cost less than $10 to make this DIY project. I got the basic wood Christmas tree in the holiday decor section at hobby lobby for about $5 when it was on sale. They had a few that were different sizes you can pick which one that you want. The twine, wood star, small clothespins and bristle brush came from Dollar Tree so that only cost a few dollars. I already had  christmas pick on hand, but I believe I got it from Michaels.

    DIY Christmas tree card holder display idea

    Christmas Card Holder Supplies

    • wood christmas tree (found at Hobby Lobby)
    • walnut wood stain
    • bristle brush (for applying stain)
    • twine
    • mini clothespins (you could also use binder clips or paper clips if you don’t have the clothespins)
    • wood star
    • christmas pick
    • floral wire
    • floral wire cutters
    • hot glue gun
    • scissors

    Variations:

    Consider making this Christmas display with your own twist:

    • Add fairy lights.
    • Spray paint the christmas tree green instead of staining it to add a pop of color.
    • Add a mini tree topper instead of a wood star.
    • Add faux snow.
    • Glue on some mini christmas ornaments.
    • Paint the wood star or add some glitter to it.

    Christmas Card Holder Instructions

    1. Apply the wood stain to the christmas tree and let it dry.
    2. Glue the twine to the back of the Christmas tree and wind it around at an angle, gluing it to the back each time you wrap it across and go in the opposite direction every time to get the zigzag effect.
    3. Add the mini clothespins to Christmas tree.
    4. Snip the ends of the christmas pick off and attach the christmas pick to the base of the tree with the floral wire.

    The detailed instructions are down below in the how-to card.

    close up of christmas tree card holder

    close up of christmas tree card holder

    DIY Rustic Christmas Card Holder

    Stephy
    easy DIY rustic christmas tree card holder to display christmas cards or photos
    5 from 1 vote
    Print Pin
    Total Time 15 minutes mins
    Yield 1 christmas tree

    Equipment

    • bristle brush
    • floral wire cutters
    • floral wire
    • scissors
    • hot glue gun and 1 glue stick
    • cloth

    Materials
      

    • wood christmas tree
    • wood stain walnut
    • twine
    • wood star
    • christmas pick

    Instructions
     

    • Using your brush, apply the wood stain to your Christmas tree going with the grain. Make sure the tree is completely covered.
    • Let your stain sit for up to 5 minutes depending on how dark you want the color to be. The longer you leave it on the darker it will be.
    • Wipe off the extra stain with a clean lint free cloth.
    • Let it dry. It takes about 2 hours.
    • Glue the twine to the back and wind it around to the front at an angle. To get the zigzag effect, you are going to glue the twine to the back each time you wind it around and go in the opposite direction. 
    • Add the mini clohthespins. Once you have them where you want them, glue the backs of the clothespins to the christmas tree so they will support the weight of the cards better without flipping over.
    • Glue the wood star to the top of the tree.
    • Cut the ends of the christmas pick off and attach it to the base of the Christmas tree with floral wire.
    Tried this project?Let us know how it was!

    Related Post

    150 Rustic DIY Christmas Decor Ideas

    More Christmas Ideas

    • 50 Free Printable Santa Coloring Pages for Kids
    • christmas tree coloring pages
      45 Free Printable Christmas Tree Coloring Pages
    • 100 Best Christmas Candy Recipes
      100 Best Christmas Candy Recipes
    • 120 Festive Christmas Appetizers
      120 Best Christmas Appetizers for a Holiday Party

    Leave a Reply Cancel reply

    Your email address will not be published. Required fields are marked *

    Recipe Rating


    This site uses Akismet to reduce spam. Learn how your comment data is processed.

    Hi, I'm Stephy! I am the owner of Prudent Penny Pincher. I have been an author, content developer, and professional blogger for seven years. Prudent Penny Pincher explores ways to save money in daily life with a particular focus on DIY projects, crafts, and budget-friendly recipes while sharing helpful frugal tips along the way.

    More About Me →

    Popular Posts

    • 150 Dirt Cheap Recipes for When You Are Really Broke
    • beef shepherds pie top of casserole
      5 Ingredient Easy Shepherd’s Pie
    • 100 Cheap and Easy Crockpot Recipes
    • 60 Best DIY Home Coffee Bar Ideas

    Fall Ideas

    • coloring pages for fall
      30 Free Printable Fall Coloring Pages
    • 55 Cheap and Easy DIY Fall Wreath Ideas
    • 100 Best Fall Crafts
      100 Best DIY Fall Crafts for Adults
    • 50 Cheap and Easy Outdoor Fall Decorations
      100 Cheap and Easy DIY Outdoor Fall Decorations
    • 100 Best Fall Crafts for Kids
      100 Best Fall Crafts for Kids
    • 100 Cheap and Easy Fall Porch Decorations
      100 Cheap and Easy Fall Porch Decor Ideas
    See more Fall →

    Halloween Ideas

    • 50 DIY Outdoor Halloween Decor Ideas
      50 Cheap & Easy DIY Outdoor Halloween Decorations
    • 100 Best Halloween Crafts for Kids
      100 Best Halloween Crafts for Kids
    • halloween coloring pages
      40 Free Halloween Coloring Pages for Kids and Adults
    • 100 Cheap and Easy Halloween Decorations
      100 Cheap and Easy DIY Halloween Decorations
    • 100 Dollar Store Halloween Decor Ideas
      100 DIY Dollar Tree Halloween Decorations
    • free halloween svg files
      35 Free Halloween SVG Files
    See more Halloween →

    Featured On

    Prudent Penny Pincher Featured websites.

    What’s Trending

    coloring pages for fall

    30 Free Printable Fall Coloring Pages

    100 Best Meal Prep Recipes

    100 Best Meal Prep Recipes

    100 Cheap and Easy Crockpot Recipes

    50 DIY Outdoor Halloween Decor Ideas

    50 Cheap & Easy DIY Outdoor Halloween Decorations

    Subscribe to the latest

      Prudent Penny Pincher Logo
      Copyright ©2023, Prudent Penny Pincher. All Rights Reserved. Design by Pixel Me Designs
      AboutPrivacy PolicyContactAccessibility Policy