From wooden tabletop accents to yard decor, these DIY Halloween wood crafts are budget-friendly, creative, and fun to make!
Looking for spooktacular inspiration this season? These wood crafts are the perfect way to combine creativity, thriftiness, and festive fun. Whether you're searching for unique DIY Halloween decor for your porch, mantel, or yard, or you want quick and easy Halloween crafts for adults, there's something here for everyone. From rustic pallet projects that add country charm to your home to simple Dollar Tree Halloween crafts, these ideas prove you don't need to spend much to make your home frightfully fabulous.
Whether you're welcoming trick-or-treaters with a cute candy box or warning visitors with a spooky "Keep Out" sign for your haunted house decor, these projects will bring spooky charm to your home this fall.
For smaller accents, tiered tray decor made from scrap wood adds an adorable seasonal touch indoors, while larger plywood displays transform your outdoor space into a haunted showstopper.
Many of these craft projects are cheap and easy, making them perfect for last-minute decorating or Halloween crafts to sell. Whether you love the spookiness of skeletons and zombies or prefer cute and kid-friendly pumpkins and ghosts, these projects offer a wide variety of options for both indoor and outdoor decorating.
These crafts are as fun to make as they are to display-and with ideas ranging from rustic porch signs to cute mantel pieces, you'll find plenty of inspiration to make your home stand out.
Halloween Wood Crafts
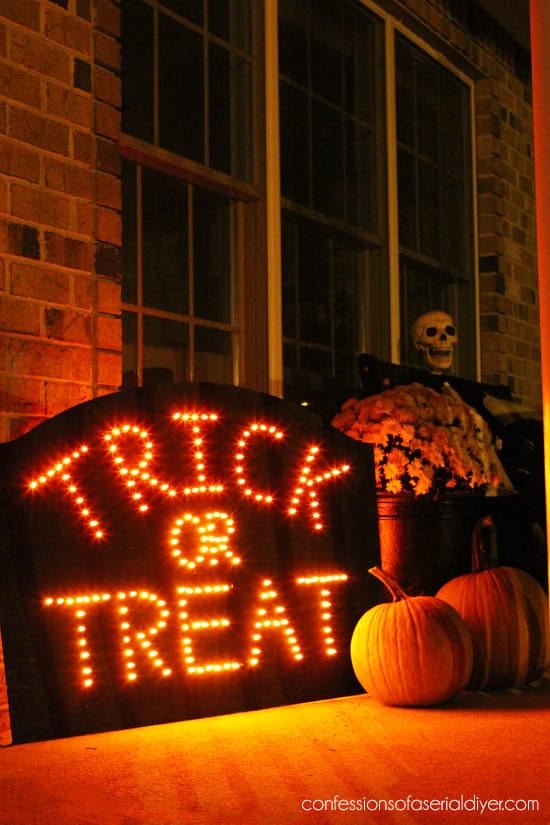
This repurposing project takes the backing from an old mirror and transforms it into a glowing “Trick-or-Treat” sign. The process is simple: sketch out your letters, drill evenly spaced holes, spray paint the surface black, and then push a strand of orange lights through from the back. Once plugged in, the sign comes alive with a warm Halloween glow that feels like a giant Lite-Brite. Best of all, it cost nothing since the blogger used scrap materials and lights she already had, making it a thrifty way to welcome trick-or-treaters!

This clever two‐sided wooden decor piece is made from a single 1×12 pine board. You cut the board into three triangular candy‐corn shapes (16″, 19″, and 22″), then paint one side in candy‑corn hues and flip them into Christmas trees using green tones and optional clear‑coat for outdoor durability. It’s budget‑savvy (only one board at around $10-13), and the reversible concept stretches its use across fall and winter seasons.
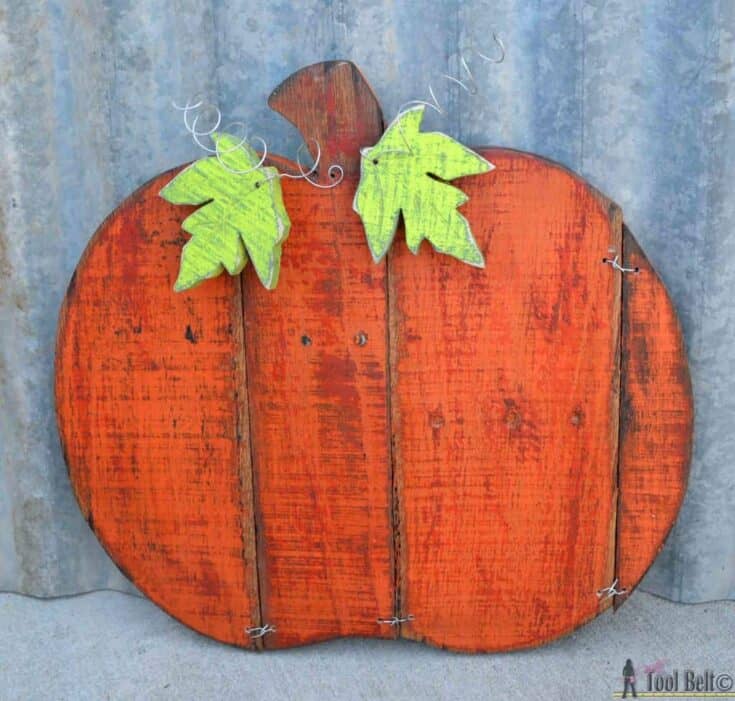
This DIY transforms reclaimed pallet slats (or fence pickets) into a rustic pumpkin with built-in character—nail heads left intact add vintage flair. To make it, you trace a pumpkin template, cut out shapes with a jigsaw, then layer paint: a dark paprika spray base topped with orange acrylic, followed by sanding to reveal pops of undercoat.
The finishing touch is a dark walnut stain over the surface and layered green-painted leaves, followed by wiring the pieces together, and you can even curl the wire for leaf tendrils or add a hanger. It’s an affordable, hands-on project that effortlessly brings cozy, rustic charm to your DIY fall decor.

This sign uses a pallet-style board from Dollar General as your canvas, where each slat gets a base color—white, orange, green, black—and becomes its own Halloween "character." You paint a ghost face on the white slat, a pumpkin on the orange, a Frankenstein on green, and a mummy on black (later white), even sketching gauzy mummy stripes before adding eyes—the details give each slat personality. A final sand-down adds a weathered finish that ties them all together in one cohesive, budget‑friendly display. It’s simple, quirky, and perfect to brighten a shelf, coffee bar, or entryway with a dose of DIY Halloween charm.
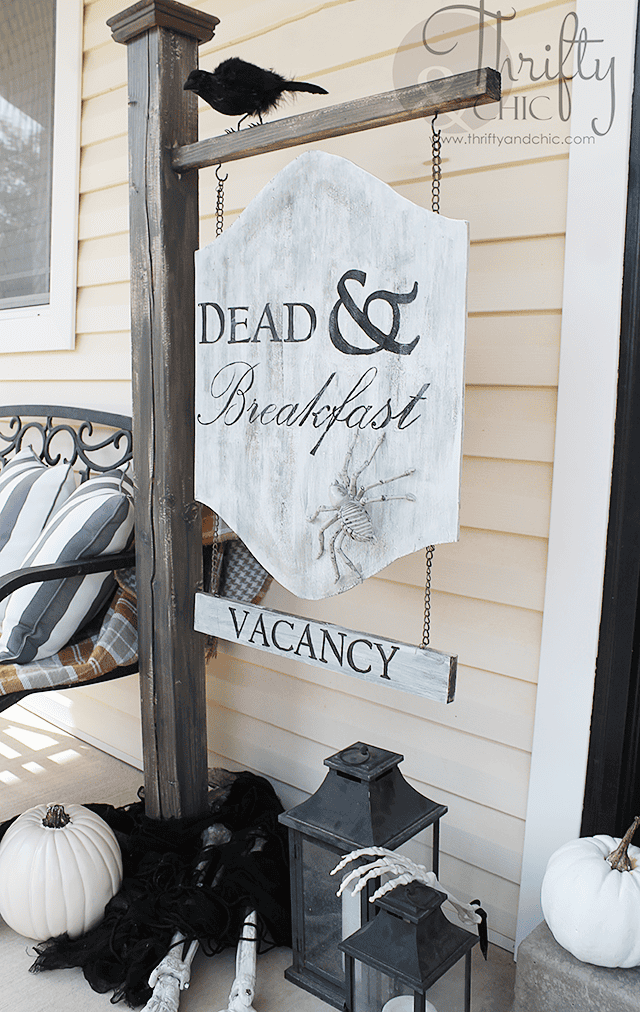
Inspired by a Martha Stewart magazine feature, this outdoor sign mimics the look of a spooky inn advertisement with a DIY twist. The arch-shaped board is cut from scrap plywood, stained in layers of charcoal and white for a weathered finish, and hand-painted with the words “Dead & Breakfast” using transfer paper and acrylic paint. A wooden post base is assembled from a 4x4, 2x4 braces, and a post cap, with chains added to hang both the main sign and a smaller “vacancy” sign beneath it. Finished with creepy accents like a raven and spider, this piece creates a professional-looking Halloween yard decoration at almost no cost.
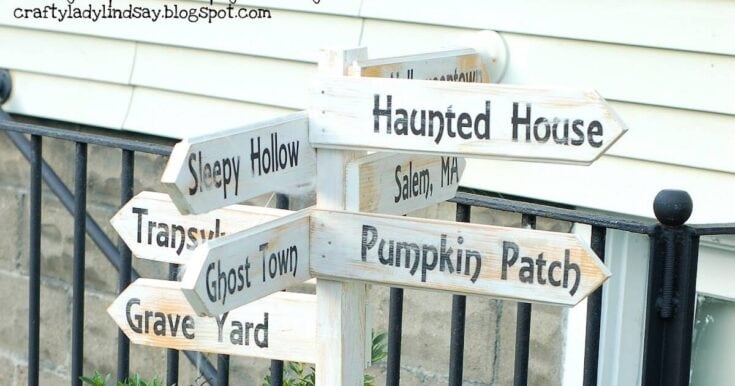
This post is handcrafted from scrap wood—each 14" slat pointing to a spooky destination like “Ghost Town” or “Sleepy Hollow” with direction arrows. After hand-painting orange, then white, a light sanding adds just the right amount of distressed character. Vinyl-cut lettering (via Silhouette) gives it a clean yet homemade style before everything is assembled upright on a four-foot post. It’s a fun DIY outdoor Halloween decor piece that costs just $2.50 to build!
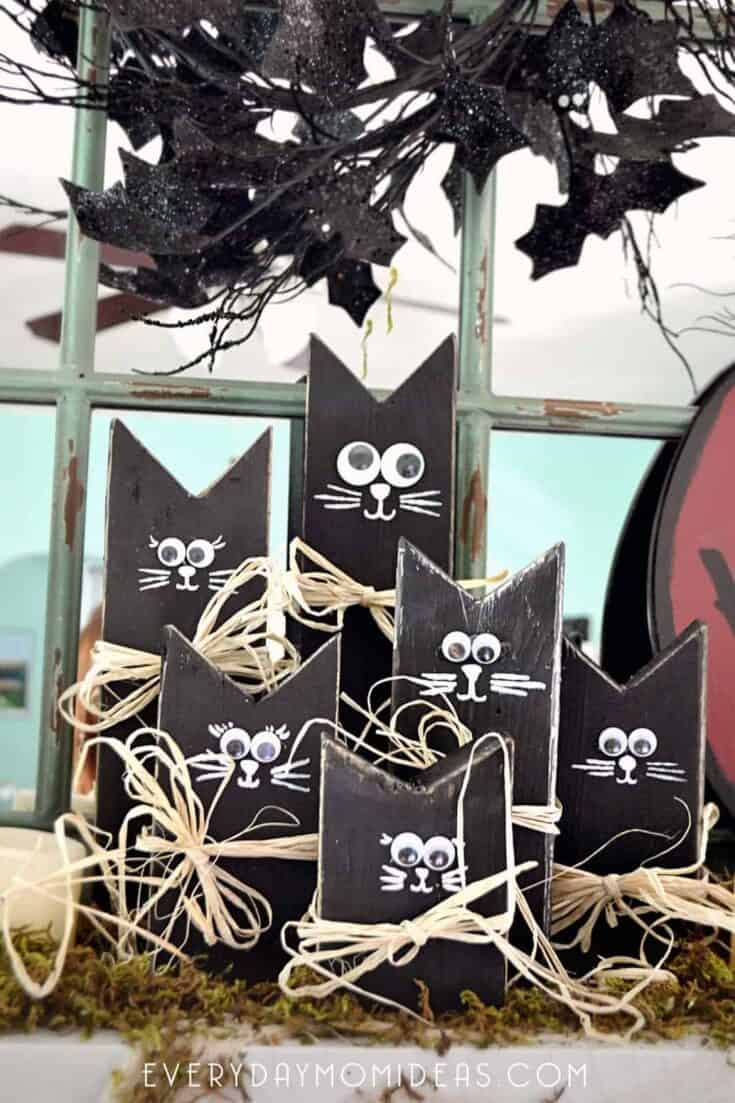
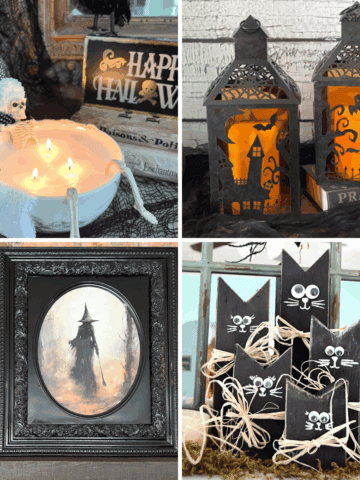
This project turns leftover 2×4 boards into a whole family of black cat cutouts—each one unique, representing a family member with personality-packed quirks. It was a super-easy, $2 craft (the blogger already had the scrap wood and paint; only the ribbons and googly eyes were new purchases). The cats come to life with coat paint, a bit of sanding, googly eyes, and straw ribbon collars. Set them in a cluster for budget-friendly and cute Halloween mantel decor.
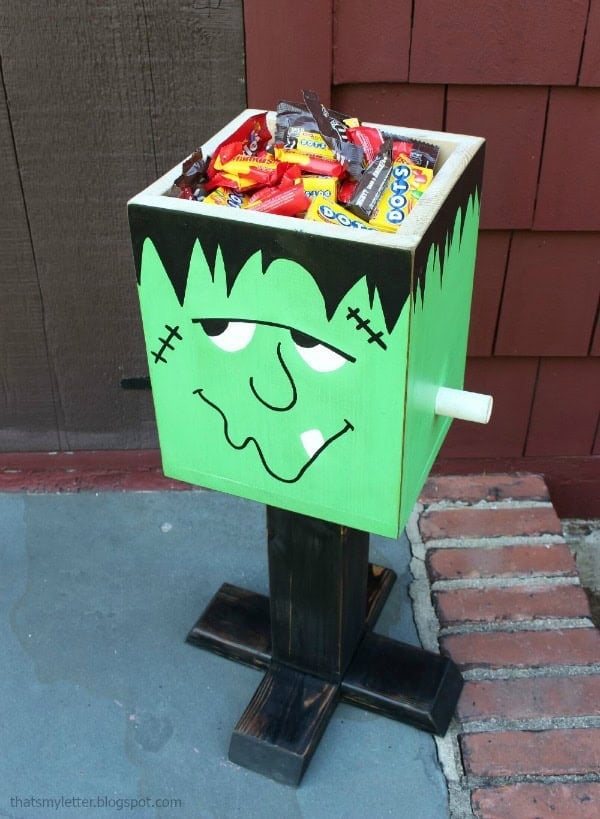
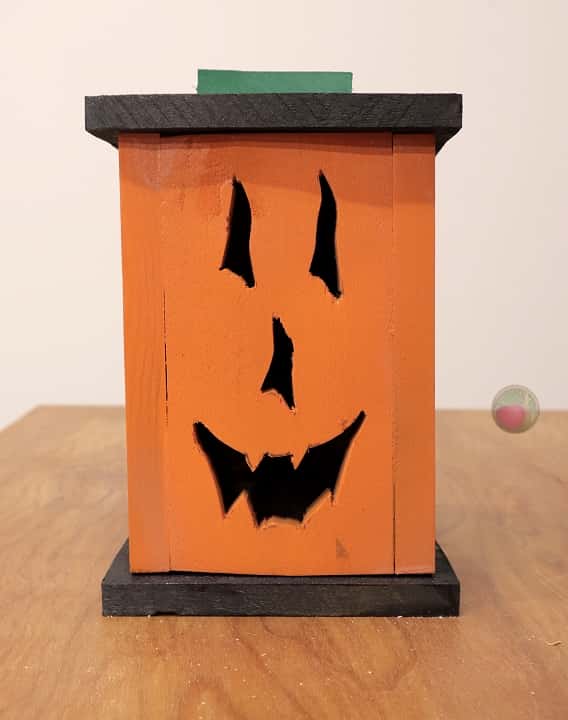
This Frankenstein-themed candy box is complete with step-by-step build plans. It's a fun Halloween project that turns simple wood into a festive treat holder. Shaped like a box and painted with Frankenstein’s signature green face, bolts, and black hair, it’s both decorative and functional. Perfect for stashing treats with a cute and spooky twist.
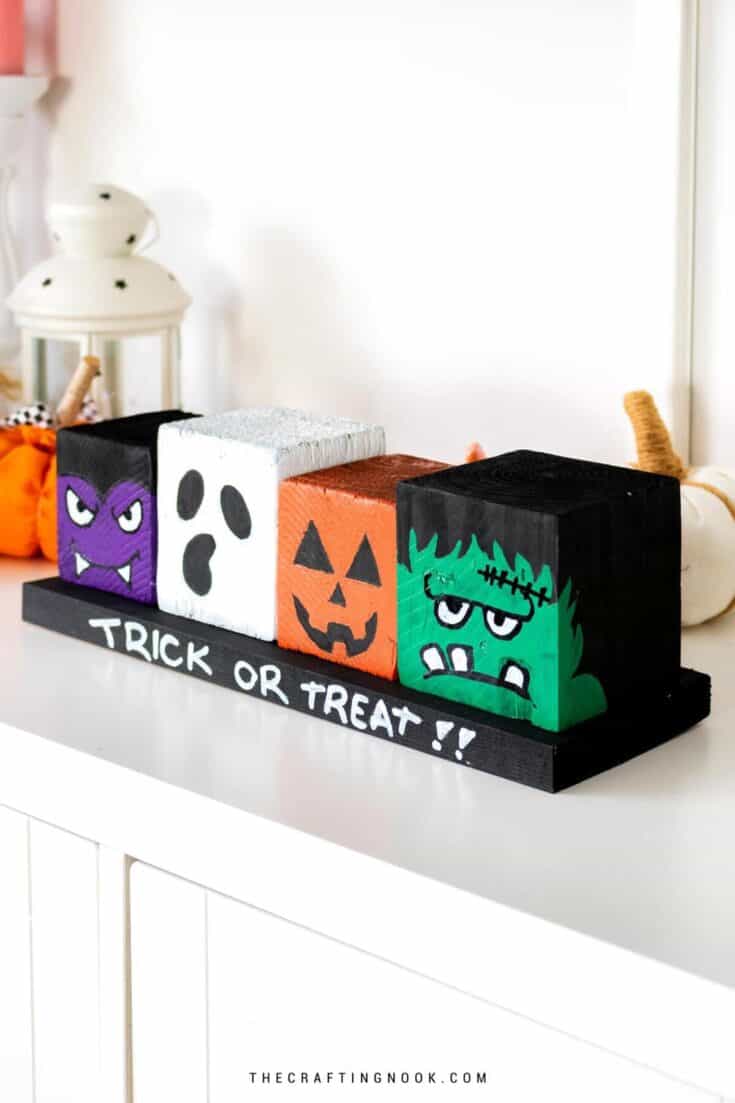
These wood block figures are a quick and fun way to add Halloween spirit to your home. It features mini characters like Frankenstein, Dracula, a ghost, and a jack-o’-lantern. The blogger upcycled leftover wood blocks and a baseboard, painting simple, family-friendly faces with no fancy tools or perfect lines required (which makes it great for crafting with kids). This tabletop display is festive, fun, and full of personality.

This spooky sign uses old pallet wood arranged haphazardly to mimic the look of a boarded-up haunted house. After assembling the boards, the “KEEP OUT” design is traced with carbon paper and painted using a Sharpie paint marker for a bold, eerie finish. To up the scare factor, a black chain and large bolt are added as embellishments, giving the sign an industrial, haunted vibe.
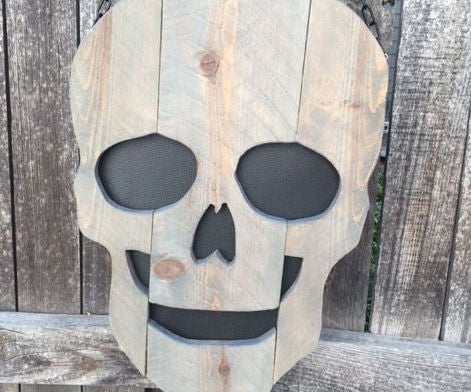
Transform a wooden fence picket into a spooky skull with just a jigsaw, some dowels, and scrap wood. The instructions walk you through tracing a skull pattern, cutting it out, and gluing pieces together with dowels for structure, producing a roughly 18″ × 12″ spooky head. It’s low-cost too — each Red Cedar picket costs around $2.50 (and smaller ones are even cheaper). If you want your skull to have black color (or any other color) behind the eyes, nose, and mouth, you can add black shelf liner material to the back. Hang it on your fence or use it as Halloween door decor, and you've got a haunting centerpiece that greets trick-or-treaters with some spooky flair.
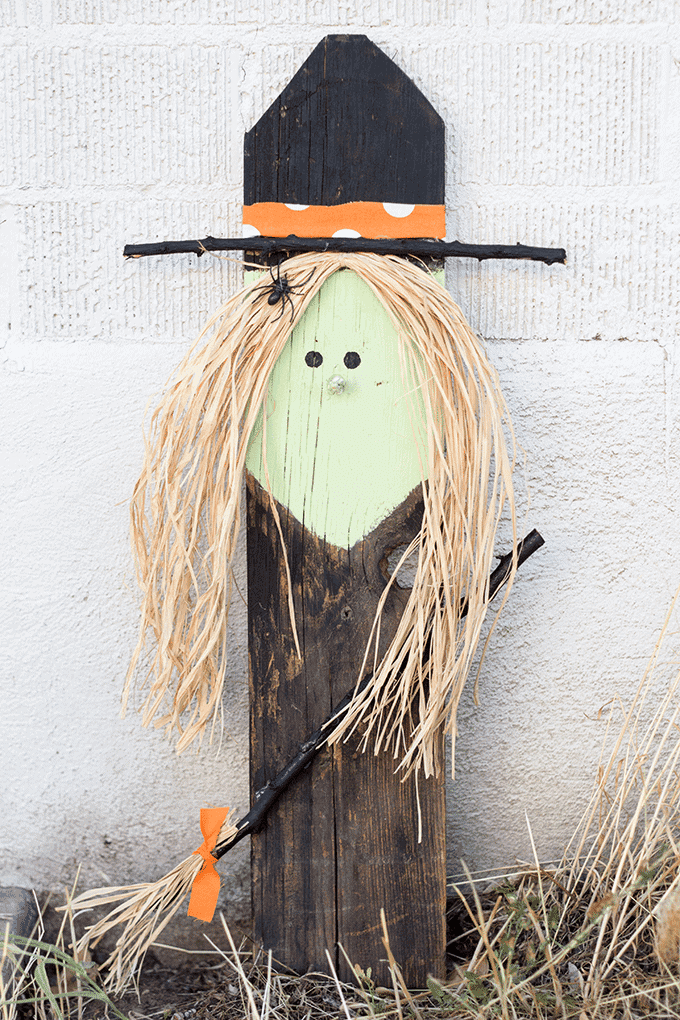
This budget-friendly witch is made from a single dog-eared fence board, a couple of tree branches, raffia, and scraps of fabric, costing under $5 to assemble. The top of the board is painted black to form a hat, while the face is coated in green craft paint with simple black dot eyes. Raffia strands become the witch’s hair, a branch hot-glued across the front creates the brim, and a smaller branch topped with raffia turns into her broom. Finished with ribbon and a few plastic spiders, this easy one-hour project is a fun and thrifty way to add Halloween charm to a porch, mantle, or doorway.
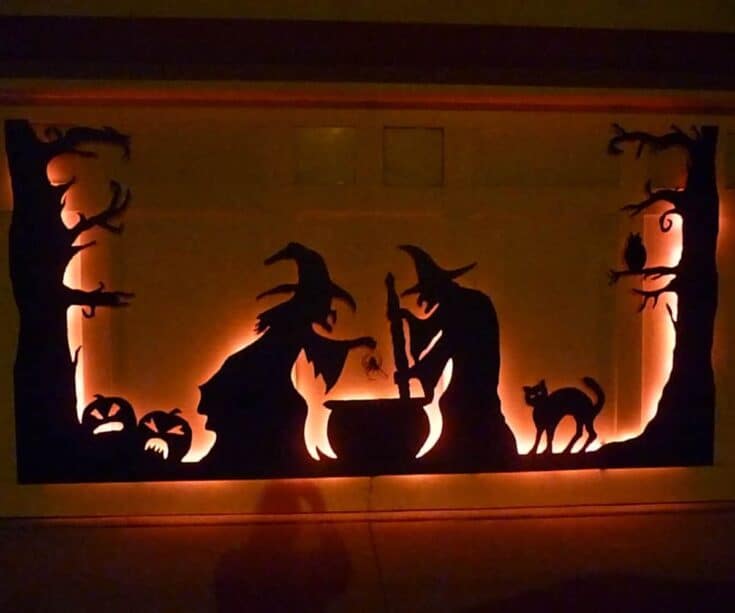
This project uses your garage door as a canvas, creating a backlit Halloween silhouette that’s a real showstopper in the neighborhood. The creator cut spooky shapes with a Dremel tool, then masked and backlit them so the night-view reveals an eerie scene glowing from behind. If you want your home to be the spookiest house on the block, this is the kind of DIY that all the trick-or-treaters will love!
This project turns scrap wood into a kid‑friendly jack o’lantern that’s easy, creative, and mess‑free. Follow the fun step‑by‑step instructions—complete with material lists and visuals—to cut, paint, and assemble a glowing pumpkin face. Whether it’s for your porch or mantel, this vintage-styled jack o’lantern project is a great way to add some spooky charm to your home on a budget.

Living somewhere humid where real pumpkins rot too fast? This rustic pallet pumpkin DIY is your perfect solution. To make it, you can dismantle pallets to get the wood, sketch pumpkin patterns, then glue and paint each board in charming farmhouse tones before giving them a dry‑brushed, weathered finish. These hand-crafted pumpkins stay intact year after year, adding cozy fall charm.
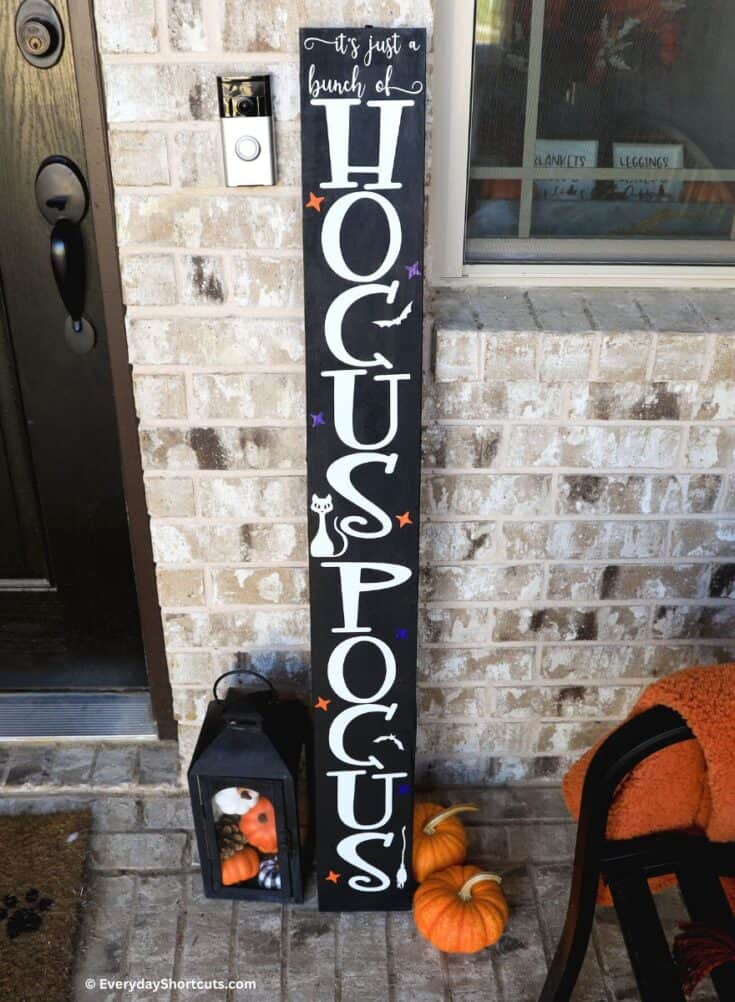
This Halloween porch decor idea turns simple Dollar Tree wood pieces into a spellbinding "Hocus Pocus" sign with the help of Cricut vinyl designs. You paint the boards matte black, upload and resize themed SVGs, and apply them as stencils. A layer of Mod Podge helps protect the piece, though it’s best kept under cover from rain or snow to preserve the finish.
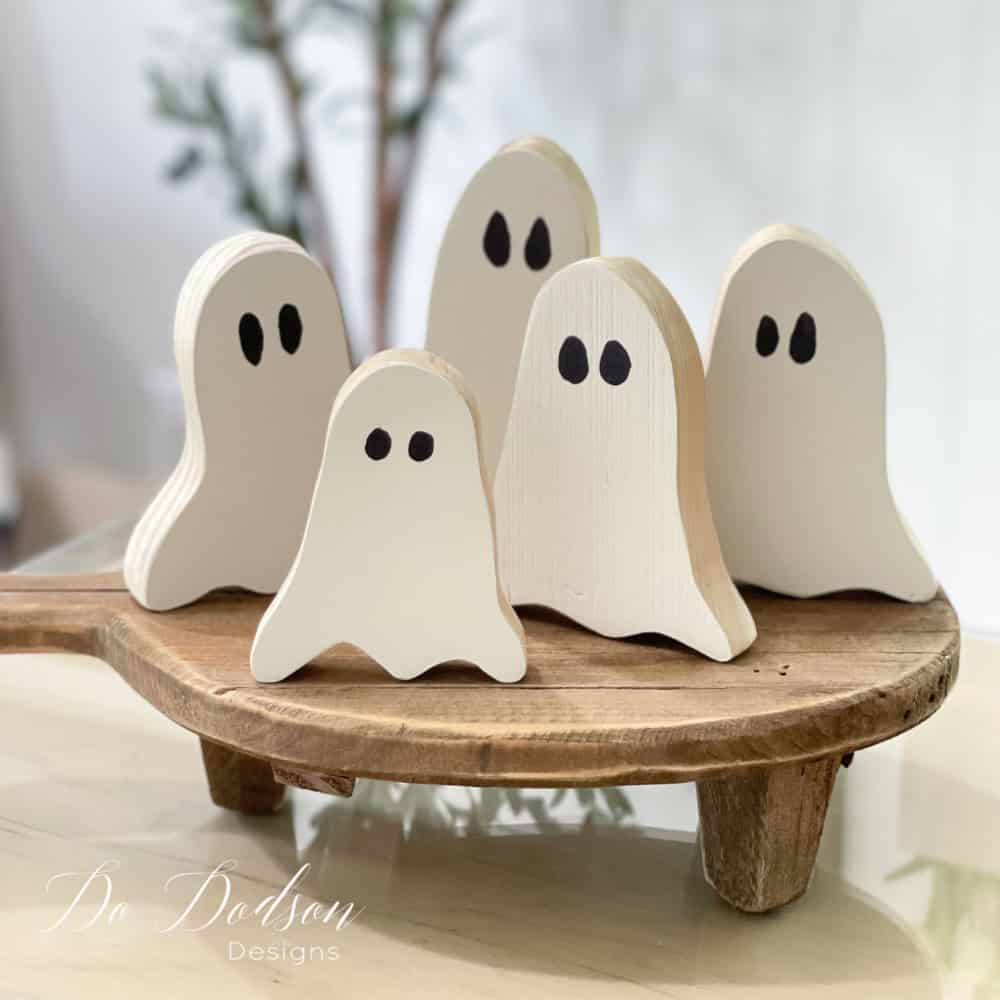
Carve friendly ghosts from a scrap board using a jigsaw, then sand the edges until smooth and paint them white—or mix it up with vibrant purples, greens, or oranges. They’re perfect for adding to mantels and Halloween tiered trays.
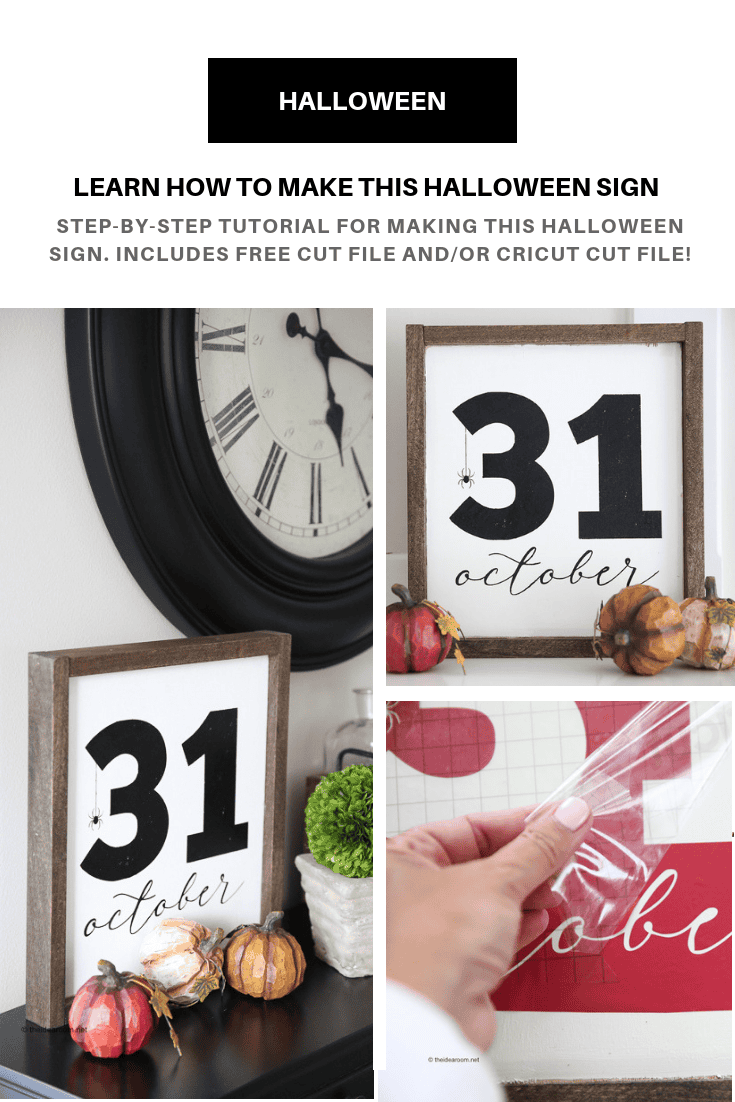
Give your home a dose of farmhouse charm with a wooden sign built with basic tools and paint. You’ll sand and prime a board, stencil the date in crisp black paint (or use Cricut vinyl), then distress the edges for that worn-vintage look before assembling a simple frame. It has stylish, spooky vibes that work beautifully on a mantel or tiered tray.
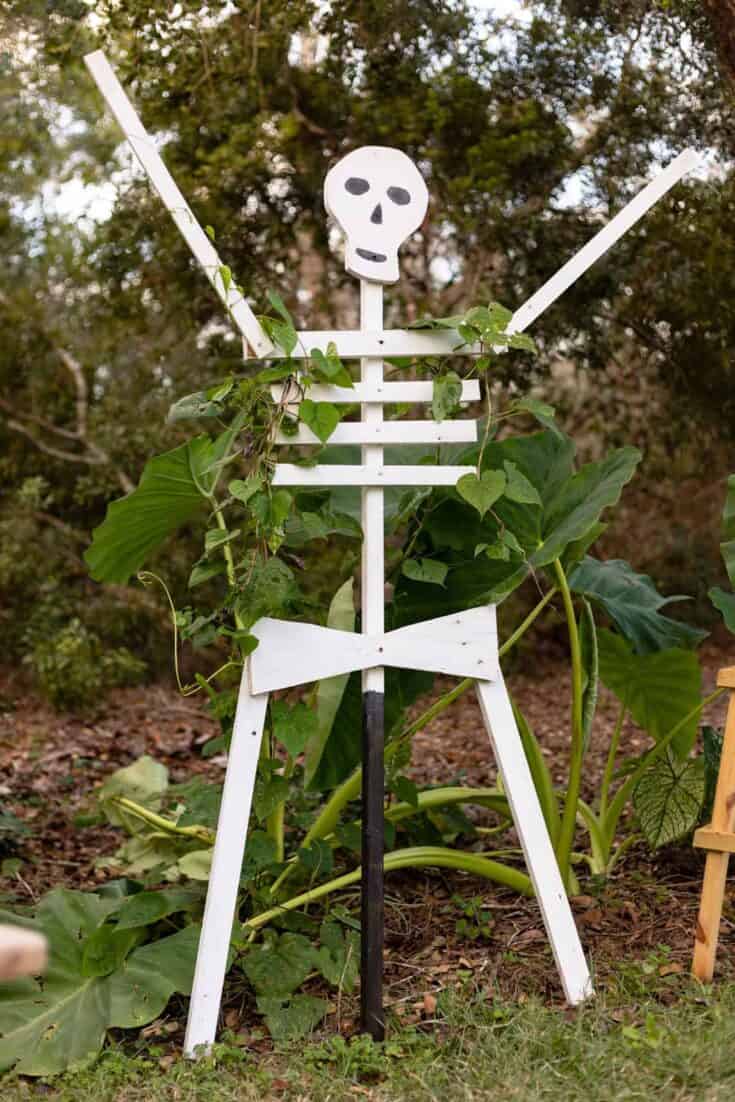
This tutorial shows you how to build life-size skeletons using inexpensive lumber—like 1×8 boards and pressure-treated 2×2s—cut into bones (arms, ribs, spine, skull), assembled with screws, and painted white for a spooky silhouette. The step-by-step includes everything from measuring and cutting to countersinking screws and facial details via graphite transfer and paint markers.
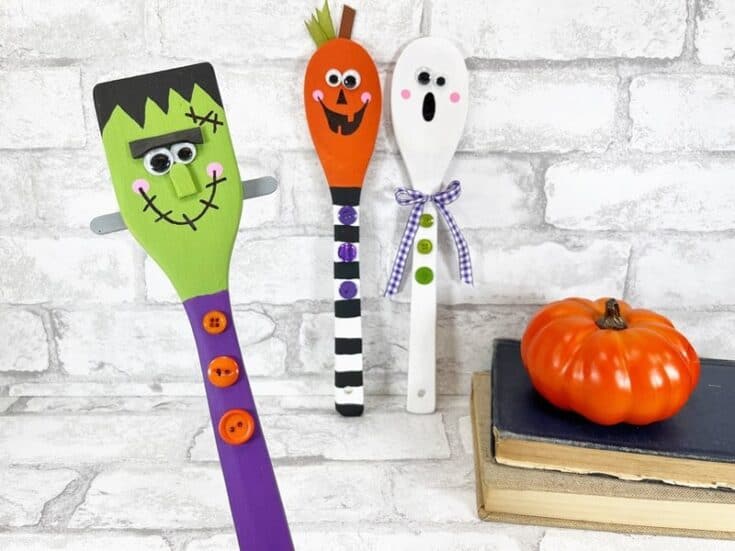
In under an hour, you can turn ordinary wooden spoons into a trio of cute characters like a ghost, a jack-o’-lantern, and Frankenstein. Aside from the paints, you can get everything else at Dollar Tree (wiggle eyes, foam, buttons, and ribbon). The details—like rosy pink cheeks, googly eyes, and fun facial expressions—give each one character and uniqueness. They are perfect for gift-giving or adding a pop of whimsy to your kitchen decor.
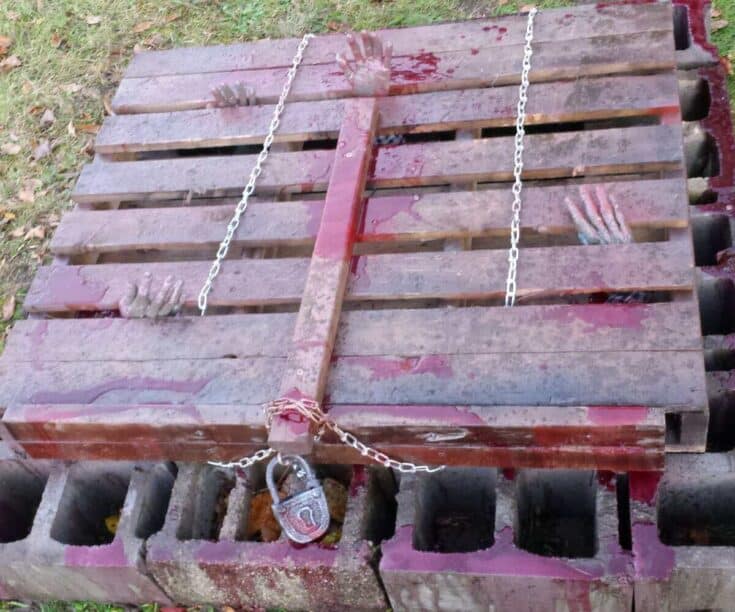
This spine-chilling centerpiece starts with a free or cheap pallet elevated on cinder blocks. Fake severed arms, painted in decay tones with green and gray over a base coat, reach up through the boards. Additional touches like chains, locks, and even food coloring add texture and visceral detail. It’s a haunting yard display built for impact, using mostly found or repurposed materials to keep it cheap and yet full of eerie atmosphere.
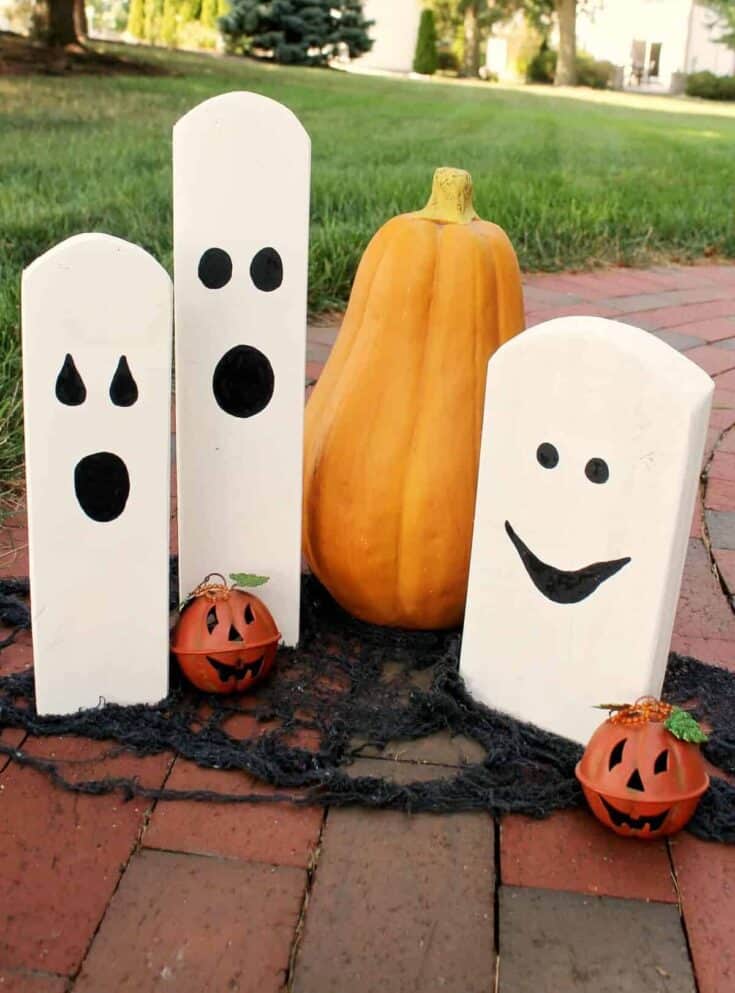
This quick, beginner-friendly DIY turns leftover 2×4 or 2×6 scraps into rustic ghost cutouts with just a jigsaw, some paint, and minimal sanding. Each ghost is shaped freehand and gets a quick white coat with rough edges kept for character, followed by simple painted faces. In about 10–15 minutes of hands-on time (plus drying), you’ll have a stack of easy, no-cost spookiness for your outdoor space.

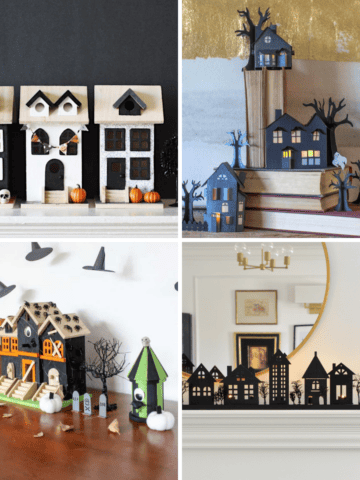
This whimsical and customizable project transforms plain wooden houses into a spooky yet cute display. Using acrylic paints, Halloween-themed scrapbook paper, and Mod Podge, this Halloween craft for adults allows you to create a town that's both modern and festive. The tutorial encourages creativity with embellishments like miniature pumpkins and banners, making each house unique.
Which of these DIY projects will you try first? Let me know in the comments, and don't forget to share your hauntingly fun creations and tag me on social media!
More Halloween Decor Ideas
- 100 DIY Dollar Tree Halloween Decorations
- 50 DIY Halloween Signs
- 100 Best Halloween Mantel Decor Ideas
- 20 Best Halloween Village Display Ideas


Follow me on Pinterest, Facebook, Flipboard, or Instagram for more inspiration on crafts, DIY, free printables, and recipes!


Leave a Reply